First, To open the A-HD, remove the battery cover and battery. Under this you will see four small black screws (long). (no photo) Remove these screws and the bottom of the casing will become loose. This is the tricky part. On the top of the A-HD there is a silver grill covering the microphone and speaker. Slide this backwards (may require a little prying) and remove to expose a fifth screw (short) (see photo). Remove this and the two sides should be able to separate. A little gentle prying is required near the top, be careful and you shouldn’t damage anything.
Source : http://www.stevesforums.com/forums/view_topic.php?id=582462&forum_id=92
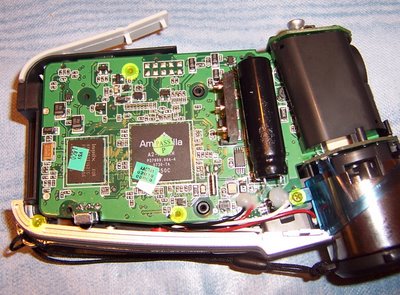
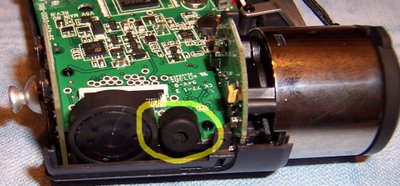
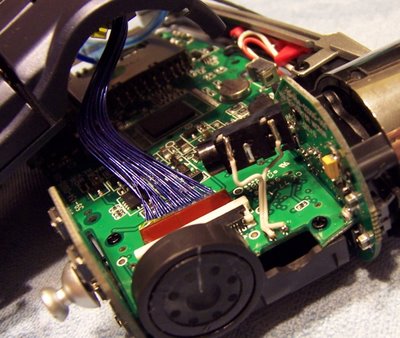
Remove the battery-side cover and you are left with something that looks like this:
Remove the three short screws, and the one long screw. The one long screw is in the blue translucent circle around the lens housing. Now the other side of the casing should be able to separate from board. Gently move aside the blue translucent plastic and get access to the screen connector. Be careful! This is probably the most fragile part of this process.
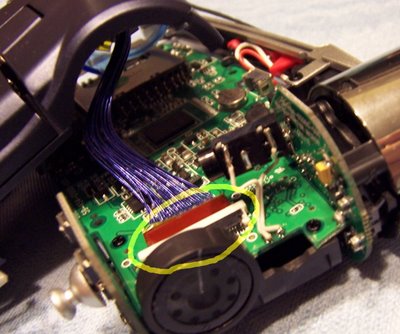
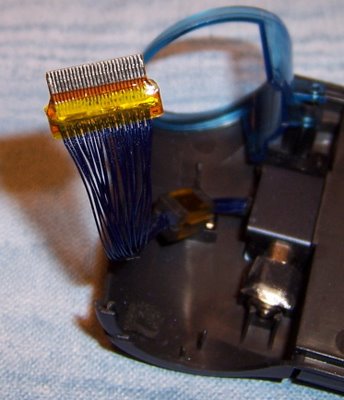
The connector is in a port. Don’t do what I did and just yank it out. Gently slide the white plastic guard towards the wires by each side and this should loosen the connection. Once it’s loose it should easily come out. Hopefully your connector is in one piece, go ahead and set this part of the case aside.
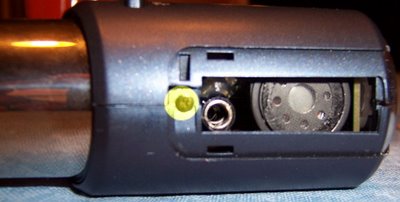
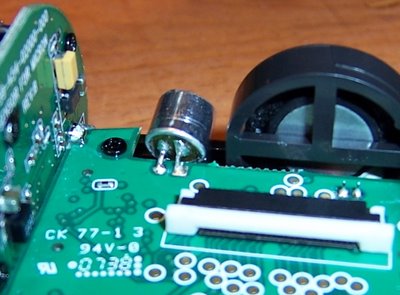
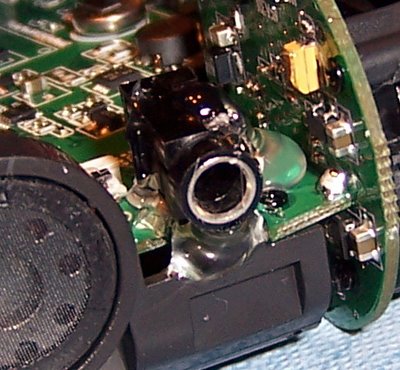
Now you should have access to the microphone! It is a small silver cylinder with two solder points, surrounding by black rubber.
You could hard-wire another Microphone here, but I decided to add a 3.5mm TRS jack. I found an old CD-Rom drive and demolished it to get access to this board.
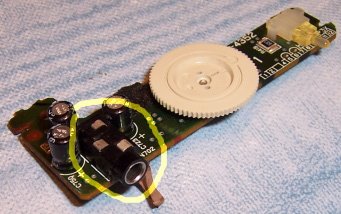
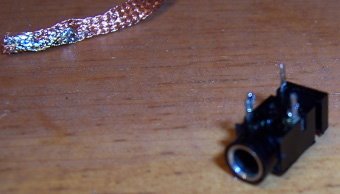
A little bit of desoldering braid and I had a nice jack!
Here’s the microphone after removing the rubber shield. The pins are soldered on this side, but also go through the circuit board to the opposite side. In order to get to the other side, the lens housing would have to be removed. After inspecting this and seeing how it was held together (screws on all three sides and some solder between the boards) I decided to just snip the pins here.
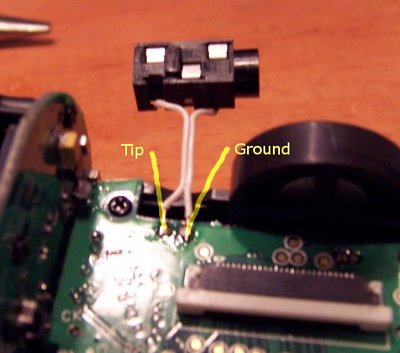
I tinned a couple small wires and added flux to all the points. Then wired the jack to the microphone ports. This is not difficult soldering, just make sure your iron is only around 15 watts so nothing gets damaged from excess heat. I didn’t have any equipment to take measurements, so I took a guess that the square pad was ground and the circular one was tip, I was right! I wired the TRS jack up this way. The A-HD mic is mono, so in reality only a TS jack is needed, so I ignored the ring pin. More info on the TRS/TS jack here: http://en.wikipedia.org/wiki/Tip_ring_sleeve
At this point I half-assembled everything (without screws) and tested. It worked! Pretty simple stuff, I just wasn’t sure if I had the pins reversed. I globbed a bunch of hot-glue on the jack to keep it secure, although not pretty.
Again be careful when inserting the screen wiring. Loosen the port by sliding the white plastic guard forward, insert the wiring, and then slide the guard back to seat the cables.
Everything else is just putting the right screws in the right places. The five long screws go on the outside and on the blue plastic ring. If you remove the silver mode/menu/photo buttons, realize that this screw has to be inserted from the reverse side, so do it first. Removal of these buttons is not necessary. If you go beyond this disassembly guide, just note that some of the screws do get smaller so keep track of what goes where.
from http://www.stevesforums.com/forums/view_topic.php?id=582462&forum_id=92
In retrospect I wish I had positioned the TRS jack a little better, so it would be flush with the silver grill. I then would drill a hole and just have a nice clean jack on top of the A-HD. Unfortunately I let the glue set, and it’s a bit recessed and off-center. This is still fine, just not as pretty! The silver grill slides right back over this if I want to take video without any audio. Hopefully I’ll find a nice little Mic to plug into the jack and then I can cut away the grill as necessary. Test videos coming soon hopefully!
Source : http://www.stevesforums.com/forums/view_topic.php?id=582462&forum_id=92
Remove the battery-side cover and you are left with something that looks like this:
Remove the three short screws, and the one long screw. The one long screw is in the blue translucent circle around the lens housing. Now the other side of the casing should be able to separate from board. Gently move aside the blue translucent plastic and get access to the screen connector. Be careful! This is probably the most fragile part of this process.
The connector is in a port. Don’t do what I did and just yank it out. Gently slide the white plastic guard towards the wires by each side and this should loosen the connection. Once it’s loose it should easily come out. Hopefully your connector is in one piece, go ahead and set this part of the case aside.
Now you should have access to the microphone! It is a small silver cylinder with two solder points, surrounding by black rubber.
You could hard-wire another Microphone here, but I decided to add a 3.5mm TRS jack. I found an old CD-Rom drive and demolished it to get access to this board.
A little bit of desoldering braid and I had a nice jack!
Here’s the microphone after removing the rubber shield. The pins are soldered on this side, but also go through the circuit board to the opposite side. In order to get to the other side, the lens housing would have to be removed. After inspecting this and seeing how it was held together (screws on all three sides and some solder between the boards) I decided to just snip the pins here.
I tinned a couple small wires and added flux to all the points. Then wired the jack to the microphone ports. This is not difficult soldering, just make sure your iron is only around 15 watts so nothing gets damaged from excess heat. I didn’t have any equipment to take measurements, so I took a guess that the square pad was ground and the circular one was tip, I was right! I wired the TRS jack up this way. The A-HD mic is mono, so in reality only a TS jack is needed, so I ignored the ring pin. More info on the TRS/TS jack here: http://en.wikipedia.org/wiki/Tip_ring_sleeve
At this point I half-assembled everything (without screws) and tested. It worked! Pretty simple stuff, I just wasn’t sure if I had the pins reversed. I globbed a bunch of hot-glue on the jack to keep it secure, although not pretty.
Again be careful when inserting the screen wiring. Loosen the port by sliding the white plastic guard forward, insert the wiring, and then slide the guard back to seat the cables.
Everything else is just putting the right screws in the right places. The five long screws go on the outside and on the blue plastic ring. If you remove the silver mode/menu/photo buttons, realize that this screw has to be inserted from the reverse side, so do it first. Removal of these buttons is not necessary. If you go beyond this disassembly guide, just note that some of the screws do get smaller so keep track of what goes where.
from http://www.stevesforums.com/forums/view_topic.php?id=582462&forum_id=92
In retrospect I wish I had positioned the TRS jack a little better, so it would be flush with the silver grill. I then would drill a hole and just have a nice clean jack on top of the A-HD. Unfortunately I let the glue set, and it’s a bit recessed and off-center. This is still fine, just not as pretty! The silver grill slides right back over this if I want to take video without any audio. Hopefully I’ll find a nice little Mic to plug into the jack and then I can cut away the grill as necessary. Test videos coming soon hopefully!